Avoid astronomical energy bills with an old inefficient thermostat. By replacing your analog thermostat with a programmable or Wi-Fi thermostat, you can save hundreds of dollars per year in heating and cooling costs.
homeandgardeningguide.com assembled helpful information to help you replace your old thermostat, new thermostat options for your home, and where your thermostat should be located.
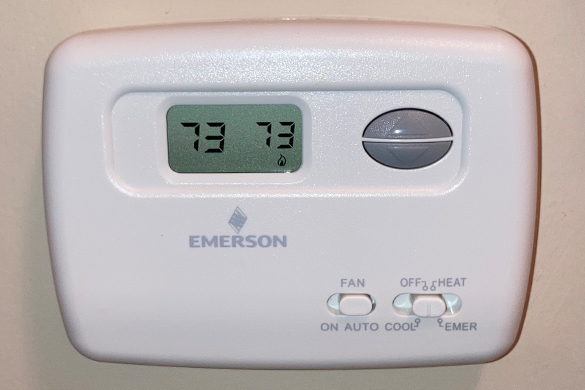
How to Replace a Thermostat
Few home improvement projects can provide the type of savings garnered from replacing an old, non-programmable thermostat. The following steps will help you upgrade your thermostat:
Project Parameters – This is an easy “beginner level” project that can be completed in under two hours. You will need the following tools/equipment:
- Screwdriver (Phillips or flathead depending on the screws used in the original installation)
- Level
- Drill (with an appropriate sized bit for mounting screws)
- Wide Painters Tape/Blue Tape (used to catch falling debris from drilling activities)
- Multimeter (voltage meter)
- Camera/Cameraphone
Tip: If your new thermostat occupies a smaller space than the old one, use touch-up paint or repaint the wall for a professional-looking job.
If you need to paint, some great tips and guidance can be found at homeandgardeningguide.com/improvement/painting/diy-interior-painting-trim-baseboard-crown-molding/
Step 1 – Turn off the Power
The first thing to do is turn off the power to your HVAC (Heating, Ventilation, and Air Conditioning) unit and existing thermostat. You can turn off the power by flipping the breaker to the off position (this breaker should be clearly labeled on the breaker panel).
Match the voltage of your HVAC wiring to your new thermostat. If the voltage is not labeled on the unit or the breaker, use a multimeter to verify the voltage.
Note: Make sure the wiring voltage does not exceed the thermostat manufacturer-specified voltage. Higher voltage wiring may lead to control damage, electric shock, or extreme fire risk.
Tip: If the wiring voltage is not labeled on the breaker or the HVAC unit, for future reference, write the wiring voltage on stickers, then place one next to the breaker and another on the unit.
Step 2 – Remove the Old Thermostat and Base
In most cases, old thermostats are attached to their base by clips or brackets. It may sound like you are breaking the thermostat when removing it, don’t stress it. Even if the mounting bracket breaks, you are replacing the unit.
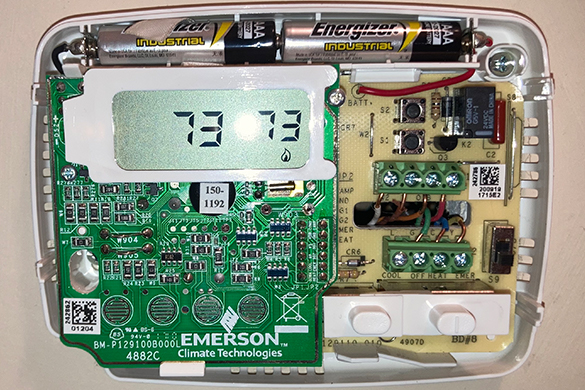
Examine the base and its wiring. Depending on the age of the unit, you may see a two-wire or four-wire configuration. Take a picture of the base and wiring before removing them from their terminals. You should also label each wire as it is removed from its terminal (these coded labels should be supplied with your new thermostat).
With the wires removed from their terminals, unscrew the baseplate from the wall and slide it off of the wires.
Note: If your old thermostat operates on a mercury-filled “thermometer,” don’t add it to your regular trash. Rather, call your local waste recycling center for proper disposal instructions.
Tip: When you pull off the old baseplate, hold onto the wires. If the wires fall back into the wall, fishing them out can get very frustrating. Use vise grips to hold the wires or fold them down and tape them to the wall.
Step 3 – Mount the New Thermostat Base
Put the new thermostat base in place (right-side up), level it, and mark the two holes. Then, drill the holes, insert the plastic anchors, pull the wires through the base, and screw it in place (follow the instructions provided with your thermostat).
Note: Depending on the thermostat model, there may be multiple holes in the base that already line up with existing holes in the wall.
Tip: Before you drill your holes, use the blue tape to attach a small plastic bag flush with the wall below the thermostat location.
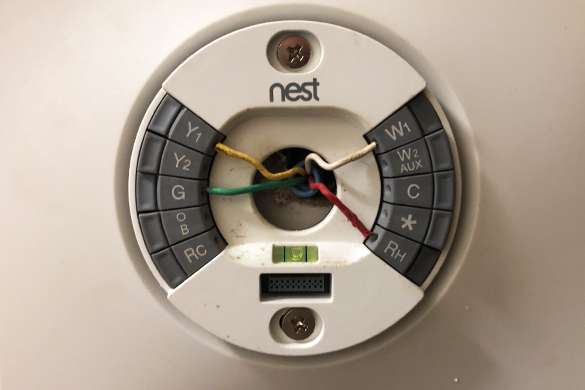
Step 4 – Wire Your New Thermostat
With the base screwed in place, spread out the labeled wires, so they are close to their designated terminal. Terminals will most commonly be “press, insert, and release” or secured by terminal screws.
If you did not label the wires, refer to the picture you took earlier and attach each wire to its appropriate terminal. Due to the immense number of potential wiring configurations, you may need to refer to the diagram in the instructions.
If there is still confusion about the wiring, call the thermostat manufacturer’s technical service line. They can help you troubleshoot wiring and other installation problems and doubts.
Once you have wired your thermostat and attached the control panel/unit, turn the power on, adjust the unit’s settings, and enjoy your handiwork!
Digital Thermostat Options
Digital/smart thermostats offer multiple features that help keep your home comfortable while reducing heating and cooling costs. Basic models are relatively inexpensive and still equipped with Wi-Fi, allowing you to connect it to the internet and control your thermostat from anywhere using your mobile device.
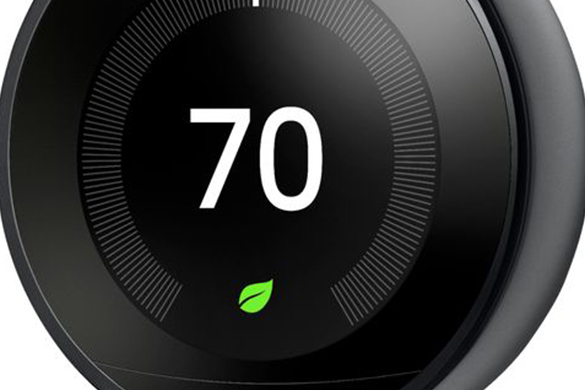
Nest Learning Thermostat – This thermostat, besides its stylish appearance, can save you between 10% to 15% on your heating and cooling bills. Consider the following:
Pros:
- Easy installation
- Can be controlled from anywhere
- Fully interactive with other Nest and 3rd-party devices (WeMo switches, Haiku fans, LIFX lighting, the Wink Hub, and more)
- Compatible with Google Home, Amazon Alexa, and IFTTT
- Geofencing (detects when you are coming or leaving home)
- Furnace monitoring
Cons:
- No remote room sensors
- Pricey (average cost of $249)
Perhaps the most advantageous feature of this thermostat is Auto-Schedule. The unit learns your daily heating and cooling temperature settings and times during the first week of operation. The thermostat then creates a schedule based on your preferences.
Note: This thermostat requires a bit of finessing until you become accustomed to the physical “dial-type” control. However, you’ll find it extremely easy and intuitive when controlling the unit from the Nest app.
Find this thermostat at:
Honeywell Home T9 Smart Thermostat With Sensor – This thermostat is best for uniform temperatures throughout your home. It has an average price of $199. Consider these features:
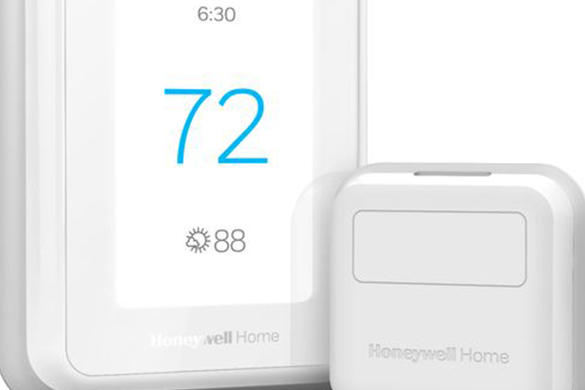
Pros:
- Easy installation
- Interacts with Alexa, Google voice commands, and Cortana
- Remote room temperature sensors
- Dual-band Wi-Fi
Cons:
- Does not integrate with other Honeywell smart devices directly
- Limited IFTTT functionality
- No HomeKit support
As previously mentioned, the feature that sets this thermostat apart is its remote room temperature sensors, giving this unit the capability to monitor and maintain temperature equilibrium in your entire home.
Find this thermostat at:
Bosch Connected Control BCC100 Thermostat – While this thermostat is not as “intelligent” as its competitors, its features and price are still quite appealing. Coming in at an average of $145, this thermostat has the following pros and cons:
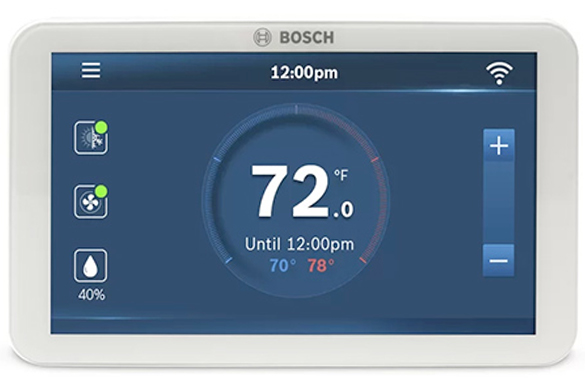
Pros:
- Easy installation
- Can be controlled from anywhere
- Large, easy to use color touch screen
- Threshold alerts
- Integrates with Alexa
Cons:
- Doesn’t have IFTTT support or geofencing capabilities
- Cannot integrate with other smart devices
For those that prefer a more “hands-on” approach, this thermostat combines simple functionality and large touchscreen control.
Find this thermostat at:
Tip: Many utility providers across the nation offer incentives to upgrade analog thermostats to digital/smart ones. Call or visit your utility provider’s website to see what offers may be available.
Digital Thermostat Location
The location of your thermostat is as essential as its many features. Thermostats are generally placed in a central area of a home. However, there are cases where a thermostat may be located in a room or on a wall that is subject to intense sunlight or severe drafts from doors and windows.
If your thermostat was mounted in a precarious location, you may have the air conditioning come on when it’s 40°F outside or the heater coming on when it should not.
To relocate your thermostat to a hallway or more central location, call an electrician or HVAC professional. Depending on your home’s configuration and existing wiring, this could be more complicated and dangerous of a job than you can handle.
Replace an Old Thermostat
In this article, you discovered valuable tips and insight to help you upgrade your home’s thermostat, several digital thermostat options, and how to determine if your thermostat is in the right location.
Upgrading your old, analog thermostat to a more modern, digital one will save you hundreds of dollars in cooling and heating costs and leave you in better control of your home’s overall energy efficiency.
Leaving your old, outdated thermostat to poorly control your HVAC can become very costly and leave your home uncomfortable during extreme temperature fluctuations.
Sources:
extension.msstate.edu/publications/energy-efficient-homes-programmable-thermostats
engineering.purdue.edu/ece477/Course/Lectures/Slides/CS1-Nest.pdf
https://grains.caes.uga.edu/news/story.html?storyid=1024&story=Digital-Degrees.
Visit homeandgardeningguide.com/repairs/heating-cooling/ for more heating and cooling articles, resources, and tips.
The post How to Replace an Old Thermostat appeared first on http://www.homeandgardeningguide.com
No comments:
Post a Comment