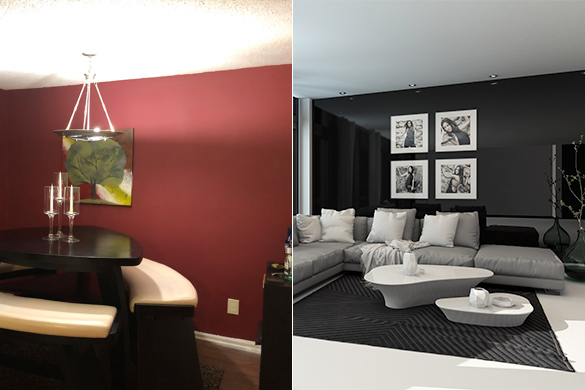
Keep your home’s drab interior from embarrassing you. By adding an accent wall to your interior decor, you can add depth and personality to an otherwise plain room.
homeandgardeningguide.com assembled helpful tips and information about what accent walls are, which wall to choose, which color to use, what you need, the preparation, and painting of the wall.
What is an Accent Wall?
An accent wall is an interior (or exterior) wall with a differing design from the others in that room. An accent wall’s color may be a different shade of the adjacent walls or designed differently with color, texture, and materials.
Accent walls often find their way in and out of interior design favor. However, when properly selected, designed, and painted, an accent wall will nearly always be the object of or initiate a conversation about your home’s decor.
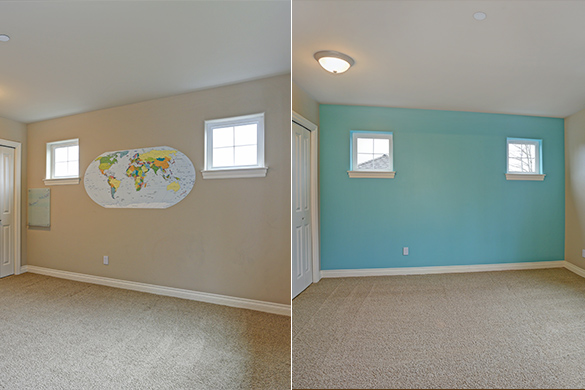
Which Wall Do I Use As an Accent Wall?
Selecting a wall as your accent wall is easier than you may think. Answer the following questions to help you determine which wall to use:
- When you walk into the room, which wall draws your attention first?
- Is one of your walls designed differently?
- Does one of your walls have a door, a fireplace, window(s), built-in shelves, or other standout feature?
Don’t forget to consider your ceiling as your accent wall. If your ceiling doesn’t have a popcorn finish and has cross beams or recessed features, it may be your best option to highlight.
If you are painting an accent wall in your bedroom, the most common wall to use is the one behind your headboard.
Tip: Avoid long walls in a room unless it has a feature that breaks it up (door, window, sliding glass door, fireplace, etc.). If an accent wall is too big, it can overpower the room and leave you disappointed after the newness wears off.
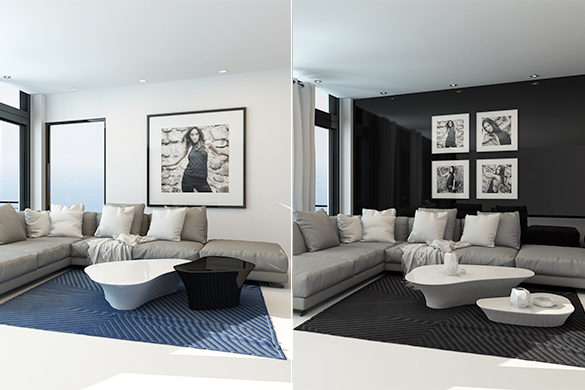
Which Color Is Best for an Accent Wall?
Twenty years ago, the answer to this question was likely red. Since the turn of the century, though, the 60/30/10 rule has helped many homeowners determine their interior color schemes. The 60/30/10 rule is explained as:
- 60% of the space painted with a dominant color
- 30% of the space should be in a secondary color or texture (often a lighter shade of the dominant color)
- 10% of the space is used as the accent (often a darker shade of the dominant color)
This design rule will help you put a color scheme together and create a color palette throughout your home.
For an accent wall, you should choose a color that complements your decor. Consider the following:
- If your 60 is cream and your 30 is tan, you could use a dark brown as your 10. This offers a stark contrast without clashing.
- If your sofa is green with yellow highlights, choose yellow so the sofa won’t disappear into the accent wall.
- If you have a dark accent wall in an adjacent room, use a lighter shade of that color for the accent wall you are painting. This ties the two spaces together.
- If you intend to use wallpaper, the colors and patterns are unlimited. Tie in the color or pattern with furniture or design accents.
See this link for some Examples of Living Room Architecture and Decor. Check out Glidden’s color palette and explore Sherwin-Williams paint colors here.
Use a flat white latex or acrylic paint as your base. When purchasing paint at a home improvement/supply store, you can have your paint tinted into over 1,000 colors. You will use just over a half-gallon of paint for a 15’ X 8’ (120sqft) wall.
Note: After painting, if you decide that the color is too bright, too dull, too dark, or just doesn’t fit, remember, it’s only paint, and you can repaint it.
Tip: Always purchase a minimum of a half-gallon more than you need (or safeguard the color code). This leaves you with a reserve that can be used for eventual touchups and repairs.
Tools and Supplies Needed to Paint an Accent Wall
The following tools and supplies will help you paint your accent wall easily and cleanly:
- Flathead screwdriver (open the paint can and remove faceplates from switches and outlets)
- Two or three disposable dampened cloths (quickly wipes up accidents and splatters)
- Putty knife
- Drywall spackle or mud
- 150 grit sandpaper
- 3/4 to 1-inch wide painters tape or masking tape
- 2-inch wide paintbrush (corner and trim work)
- Standard 7 to 12-inch synthetic roller with a 3/16 to 1/4-inch nap (thickness)
- Sturdy roller tray
- Extension pole for your roller
- Drop cloth (paper, cloth, or plastic)
- Power drill
- Auger drill bit (10 to 12-inches) and one 6-inch zip tie
- The paint
- 1 empty paint can
- A sturdy step, stool, or small ladder to get you to a comfortable height for trim work along the top edge of the wall
Tip: Use a floor duster to “wipe down” the wall from ceiling to floor. Dust and cobwebs can leave undesired textures and a “dirty appearance.”
Painting Your Accent Wall – Preparation
The time you spend preparing your wall will make painting it much easier and less time-consuming. Consider the following:
- Move any furniture near the wall to the opposite side of the room (give yourself space to work).
- Cover a small table or surface to work from.
- Remove switch and outlet faceplates (this is a great time to clean or update them).
- Remove fixtures or coverings like doorbell covers and motion sensor covers.
- Remove nails and screws from the wall.
- Put your drop cloth in place.
- Fill holes with drywall spackle or mud (this is the time to repair any issues along baseboards or trim).
- Once dried, use 150 grit sandpaper to smooth your repair work.
- Wipe down the wall again, removing all dust and debris.
- Unless you are comfortable cutting (painting trim) without tape, apply masking or painter’s tape to your baseboards, trim, and edges.
- Turn off your central air and use fans blowing out of (away from) the workspace. Circulating air in the space can deposit dust all over your paint job.
Note: Your preparation of the wall will have a direct impact on the outcome of your painting. People notice uneven lines and painted fixtures or faceplates. They also see work that looks professionally done. It is worth the time to thoroughly prepare your accent wall.
Watch this video on filling nail or screw holes in drywall.
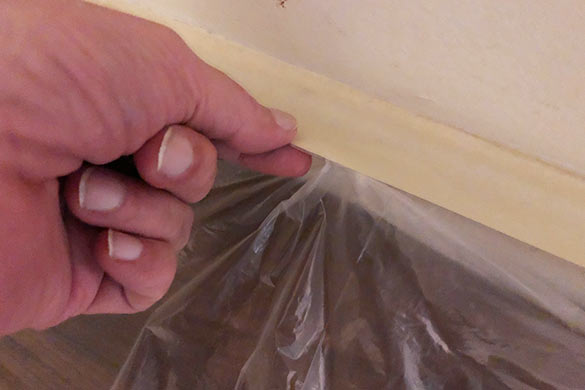
Tip: If you are concerned about the masking or painter’s tape leaving a “bubbly” or uneven edge, seal it. Do this by:
- Applying the tape
- Painting the tape’s edge with the wall’s original color (this will fill in and seal the imperfections)
- When dried, paint the new color as instructed in the next step (cutting the wall)
When it comes time to remove the tape, you’ll be left with a flawlessly straight edge.
Tip: If you are using a plastic drop cloth, when you apply tape to the baseboards, stick the drop cloth’s edge to the outside half of the tape.
Painting Your Accent Wall – Cutting The Wall
Now that your wall is prepped, it’s time to start painting it. When you paint the wall’s trim, and around its fixtures, this is called “cutting the wall.” Consider the following:
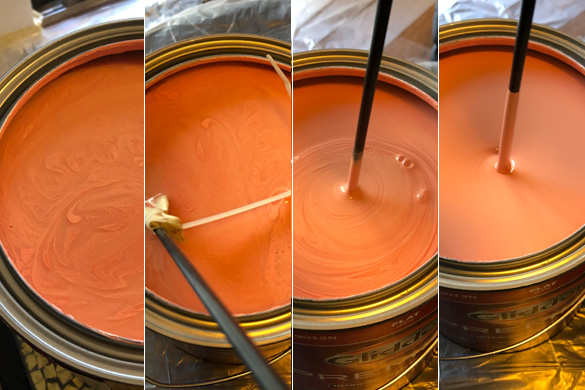
Preparing The Paint – Use your screwdriver or prying tool to gently open your paint. Once the can is open, place it on your covered table and:
- Stir the paint (see image below)
To thoroughly stir your paint (especially if it has been sitting for a while), do the following:
- Attach a zip tie to the end of your auger drill bit
- Insert a small wad of tape between the zip tie and auger (this keeps it in place)
- Pull the zip tie tight
- Bend the zip tie in half, so it forms an L or 7 shape
- Attach the drill bit to your drill
- Submerse the zip tie deep into the can
- Start the drill slow at first, then increase the speed (don’t drill a hole in the bottom of the can)
- Keep stirring until the paint is fully mixed, then stop the drill
- Carefully remove the drill bit and zip tie from the paint can
- Immediately discard the zip tie and wash your drill bit
Cutting The Wall – Pour about 1 inch of paint into the empty paint can. You will do your brushwork from this can (trying to use the full can may cause unwanted drips and splatters). Follow these steps:
- Dip your brush into the paint you separated previously and “fill” the brush
- With mild pressure, scrape all four sides of the brush on the can’s rim (you’re working with the paint left inside the brush)
- Paint around fixtures, switches, and outlets to get a feel for the brush and the paint’s texture
- Paint along the ceiling’s edge (if your ceiling is textured or popcorn), apply pressure to the brush to push its bristles into the edge, and trace the edge as straight as you can
- Paint the vertical corners/edges
- Paint the edge along the baseboard
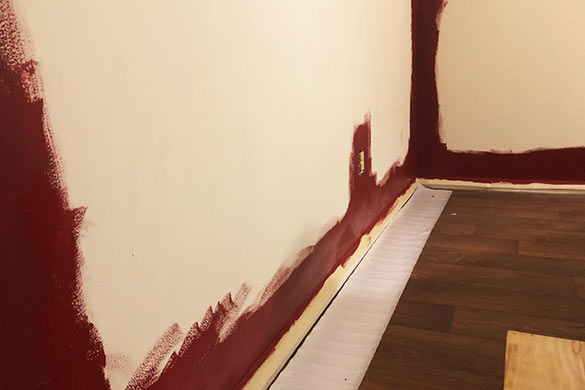
Tip: When cutting a wall, you should paint from the edges inward (or the fixtures outward) about 3-inches. Also, use the brush to paint areas of the wall where a roller may not fit.
Note: Use a stool, step, or ladder for work that is above your head. This will help you avoid strain, muscle fatigue, and potential injury.
Painting Your Accent Wall – Rolling The Wall
Once your wall is cut, it’s time to roll it. The following steps will help you roll your wall like a pro:
- Fill the trough (deep end of the roller tray) halfway.
- Attach the extension pole to your roller (if you are using it).
- Fill the roller by rolling it into the paint, lift it, return to the starting point and roll it into the paint again. Repeat until the roller looks full (never fully submerge the roller in the paint).
- Working left to right or right to left, apply paint from ceiling to floor with slow and deliberate rolling motions.
- Continue rolling and refilling as needed until your wall is completely painted.
- Shine a couple of bright lights on the wall to expose “holes” or flaws in the paint job and correct them with the roller or the brush.
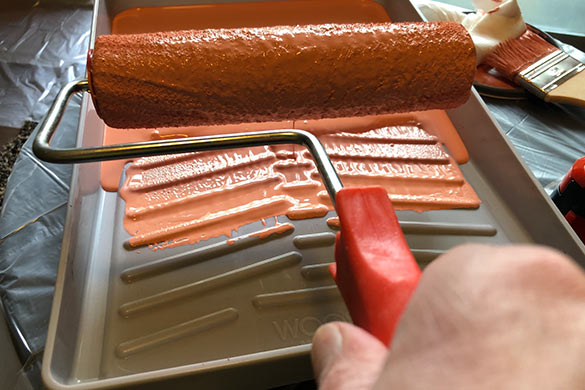
Note: Many will recommend rolling in W’s, M’s, or V’s, then crisscrossing for smooth coverage. At Home and Gardening Guide, we recommend painting floor to ceiling 2-feet at a time or two rollers wide.
Tip: Save your back from all the bending, crouching, and reaching by using a sturdy extension pole on your roller (Most standard broomsticks will screw onto most standard rollers).
Inspecting The Wall – Before you seal up your paint and roll up your drop cloth, wait for about 15 to 20 minutes. Then:
- Carefully remove the painter’s or masking tape from the wall’s edges. There may be some touchup work to be done.
- If you purchased poor quality paint, you will see “bleed” (it looks like the paint was too thin), and the wall will likely need to be cut and painted again.
- Examine the wall looking for “dots” where the paint separated; touch these up.
- Stand back and look for flaws. Repaint or touch these up.
Once you are satisfied with the paint job, pour any excess paint from the “empty” can and the roller tray back into the original can and seal it shut.
Finish The Job – Once your wall is painted and dried, it’s time to finish up your work. Here’s what’s left:
- Roll up your drop cloth. If you used paper or plastic, you can discard it.
- Put your clean or updated faceplates and fixtures back in their places.
- Clean and put away your tools.
- Clean and put away your paintbrush and roller.
- Return your furniture to its place
Note: When cleaning oil or lacquer-based paint products, these residuals should be taken to a special household waste collection center. Check with your local municipality for locations. Do not allow these paints to go down your drain; they are not soluble with water.
Watch this video about cleaning latex and water-based paint from your brush and roller.
Painting Accent Walls
In this article, you discovered what an accent wall is, how to select an accent wall, how to choose its color, the equipment, preparation, and painting of the wall.
By adding an accent wall to your living space, you are adding depth, warmth, and personality to an otherwise monotone room.
Choosing the wrong wall or color may turn your accent wall into more of a distraction than an accomplishment.
Sources:
nyiad.edu/design-articles/interior-design/redesiging-any-room-with-paint
scalar.usc.edu/works/anne/interior-accents-for-a-fresh-look
4hresources.tennessee.edu/Projects/activities/LineDesignbw-W137.pdf
Visit homeandgardeningguide.com/improvement/painting/ for more painting articles, resources and tips.
The post Accent Wall Tips appeared first on http://www.homeandgardeningguide.com
No comments:
Post a Comment